Using a Pi-hole to Block Ads and Trackers on a Verizon FIOS Router, Part 2 - DHCP
If you followed the steps in the previous post, you have an ad and tracker blocker on your network. You have achieved a lot and can choose to stop there.
But when you look at the query log on the Pi-hole, you will see all DNS requests are coming from the router, probably 192.168.1.1.
You can’t -
- tell what device is making a particular DNS request
- apply different blocking rules to different devices
This is because of the FIOS router’s DHCP (Dynamic Host Configuration Protocol). It is the service that hands out IP addresses to devices that connect to your network. Along with giving out IP addresses, the DHCP service also tells connected devices to use 192.168.1.1 as the DNS (even though you updated the DNS settings to point to the Pi-hole). The router then forwards the DNS lookups to the Pi-hole. That is why all requests to the Pi-hole look like they are coming from 192.168.1.1.
To fix this, you can use the Pi-hole as a DHCP server. It will take over handing out IP addresses, and it will tell connected devices to use the Pi-hole directly for DNS. After these changes, you will see which device is making which DNS request.
But there is a complication…the Guest Network.
The Guest Network
The guest network is the network you let friends use, or devices you don’t quite trust. It doesn’t have access to the main home network, but does have internet access. It has a different WiFi SSID and password than your main home network.
DHCP Servers
Generally, you want just one DHCP server on a network. Ideally, you would disable the FIOS DHCP service and use the one on the Pi-hole.
But the FIOS router supports two networks - your main home network and the Guest Network. And you have very little control over the Guest Network. I could not find a screen with any of its configuration information.
If you disable the DHCP service on the router, devices on the guest network will not receive IP addresses and will not be able to access the internet.
There are a couple of ways to address this. If you don’t use the Guest Network, you can go ahead and disable the DHCP service, but if you do use the Guest Network, you have to keep the DHCP service active.
Either way, you will have some common steps.
Getting the Router and Pi-hole DHCP service ready
The router
Go to your FIOS router. Navigate to the Advanced settings page, and click on IPv4 Address Distribution.
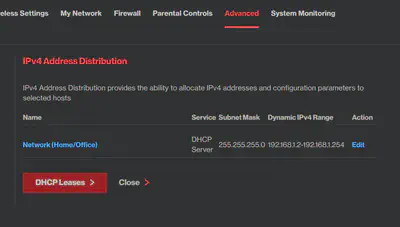
Click Edit. You will see something like -
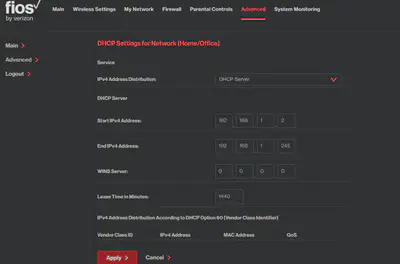
Don’t make any changes just yet.
The Pi-hole
Go to DHCP settings.
Enter the start and end addresses.
I use 192.168.1.2 to 192.168.1.150. This leaves plenty of room for static IP addresses.
My gateway is 192.168.1.1, and my netmask is 255.255.255.0.
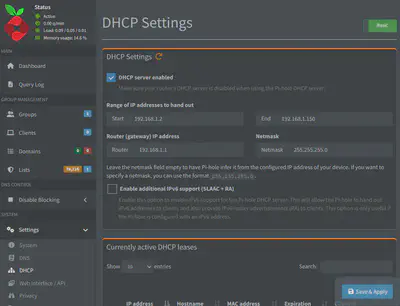
DO NOT APPLY THE CHANGES YET.
Here is where the paths diverge depending on whether you need to keep the Guest Network working or not. If not, follow option 1, otherwise, follow option 2.
Option 1. You DO NOT use the guest network
If this is the case, you can safely turn off the FIOS router’s DHCP service and turn on DHCP on the Pi-hole.
Be ready to make two changes in short order.
First, on the router. Click the drop-down where DHCP Server is selected, and change it to Disabled. Apply the changes.
On the Pi-hole, click Save and Apply.
You’re done. New DHCP requests will go to the Pi-hole.
Option 2. You DO use the Guest Network
If you use the Guest Network, you should keep the router’s DHCP service on, but you will reduce the range of IP addresses it can serve, and you will assign static IP addresses to everything in this range. This will allow the Pi-hole to serve all devices that connect to the main home network, and lets the router handle the guest network.
Go to the DHCP settings page, see the image above, and reduce the IP address range, setting the start to 192.168.1.252 and the end to 192.168.1.253 or something like that.
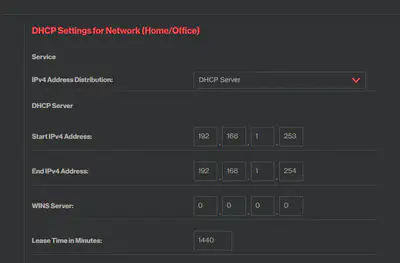
Apply this.
Now click DHCP Leases, and add two static IP addresses, one for 192.168.1.253 and one for 192.168.1.254. Use MAC addresses like AA:BB:CC:DD:EE:FF and AA:BB:CC:DD:EE:EE.
Now this DHCP server will continue to serve the Guest Network, but will not be able to serve the main home network as it has no free addresses.
On the Pi-hole, click Save and Apply.
You are done!
On your computer, phone, or other device, disconnect it from the network (turn off WiFi, pull the Ethernet cable, etc.) and reconnect it.
When it reconnects, you will see it appear in the list of currently active DHCP leases on the Pi-hole.
Conclusion
The Guest Network, and the lack of transparency into how it is configured, made this more difficult than it should have been, but either way, you should now have DNS and DHCP up and running from the Pi-hole.