Using a Pi-hole to Block Ads and Trackers on a Verizon FIOS router, Part 1 - DNS
A while ago I showed where the DNS settings are on a Verizon router, now I will show how to switch over to the Pi-hole for DNS.
Your Verizon router interface may be a little different, but the steps will remain more or less the same.
In part 2 of this short series, I’ll show how to switch over to the Pi-hole for DHCP.
I am not going to show how to set up the actual Pi-hole, there are plenty of tutorials out there. I like this one from Cross Talk Solutions.
Assumptions
- You have read the post on getting to the FIOS DNS settings (linked above)
- You have a Pi-hole already set up on a static IP address
- You have added the block lists you want
1. Test that the Pi-hole is working
On your computer, go to the DNS settings for your network connection and put in the static IP address of Pi-hole. Remove any other entries for DNS.
Log in to the Pi-hole and watch the query log.
Visit some sites on the computer you just pointed to the Pi-hole’s DNS.
On the Pi-hole, you should see lookups for the sites you are visiting. The lookups will look like they are coming from your computer’s IP address.
Once you are happy the Pi-hole is working, undo the DNS changes.
2. Reduce the DHCP range on the FIOS router
The Fios router insists on assigning primary and secondary DNS IP addresses. So you need to add a second IP address to the Pi-hole.
Before doing that, you need to make sure the address is free. This is a good opportunity to reserve a portion of the subnet for static IP addresses.
Go to the Advanced settings page, and click on IPv4 Address Distribution.
Take a look at the DHCP leases, it will look something like this -
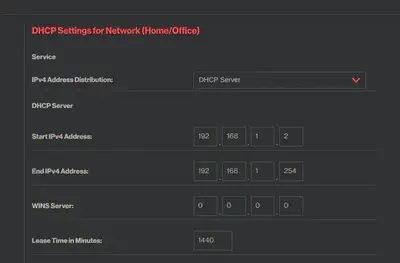
The whole range from 192.168.1.2 to 192.168.1.244 is available to DHCP. 192.168.1.1 is the router itself, and 192.168.1.255 is the broadcast address.
Find some IP addresses currently unassigned near the top of the range, i.e > 192.168.1.240. Note down one of those addresses.
Update the DHCP to hand out addresses from 192.168.1.2 to 192.168.1.239 (or something like that). It doesn’t matter if there are IP addresses assigned to a number higher than .239, devices will keep those IP addresses until the next renewal.
3. Adding a second static IP address to the Pi-hole
You need to add a second IP address to the Pi-hole because the FIOS DNS settings require two different IP addresses.
The first step is to find out the name of the wired connection on your Pi-hole.
SSH to it and run -
nmcli con showYou will see something like -
NAME                UUID                                  TYPE      DEVICE
Wired connection 1  ac8d820c-db01-453d-9578-e6fe92e2c846  ethernet  eth0
lo                  caa89408-2473-4688-b94d-0ff553933a92  loopback  lo
You want the eth0 device name, in this case Wired connection 1.
Pick one of the free addresses from the .240 to .254 range and assign it to the Pi-hole as a second IP address using -
sudo nmcli con mod "Wired connection 1" +ipv4.addresses 192.168.1.253
sudo nmcli dev reapply eth0
To check that the IP address has been applied, run -
ip -4 addr show eth0You should see two IP addresses associated with eth0.
4. Update the DNS settings on the FIOS router
Go back to your FIOS router and update the DNS as shown in my other post.
You don’t need to restart anything on the router.
DNS requests from your devices now go to the router, and from the router to the Pi-hole.
If you go to the Pi-hole query log, you will see requests arriving. They will all appear to be coming from the router, so you can’t tell your devices apart. I will show you how to fix that in the next post.