Sharing Internet Access from a Ubuntu Laptop to a Raspberry Pi
This and the next post are going to be almost identical because the one technique achieves two distinct goals, and I want each title to reflect just one goal.
In this, I will show how to share a laptop’s internet with the Pi. In the next post, I will show how to ssh to the Pi from a laptop if you have no monitor, keyboard, or shared network.
I recently got a Raspberry Pi 4, and sometimes I’m out and about with it and my laptop. If I want to SSH into the Pi, a few things have to align -
- the laptop and the Pi need to be on the same wifi network
- that wifi network needs to allow communication between devices
- the Pi needs to be authenticated with the wifi network, but I don’t have a monitor or keyboard with me.
If I connect the Pi to my laptop with an Ethernet cable, then I can ssh to the Pi and work with it. A happy side effect is that the Pi will have internet access, too, using my laptop’s wifi connection - my laptop becoming a router for the Pi.
My Setup
I have -
- Ubuntu on my laptop
- Raspberry Pi 4 with the 64-bit Lite OS
- an Ethernet cable connecting the two devices
Sharing Internet from Laptop to Raspberry Pi
Plug the cable into the laptop and the Pi. It doesn’t have to be a crossover cable, a regular Ethernet cable will work.
1. The Ethernet Connection
Go to Settings → Network.
There might be a few sections, the top one is probably the one you need. It might be called Wired, Ethernet, PCI Ethernet, or something similar.

2. Changing the Profile
Click the gear icon to edit the profile, move to the IPv4 tab, and change the method to Shared to other computers. Click Apply.
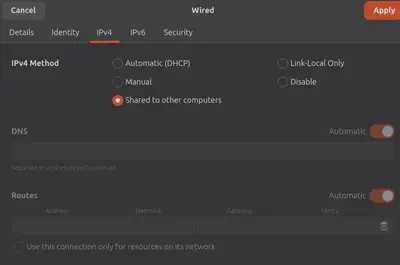
3. Connecting the Laptop and the Pi
Plug the cable into the laptop and the Pi. The Pi should get an IP address from the laptop.
4. Finding the Pi’s IP Address
I know the name of my Pi is pi4, so I can ping it at pi4.local to see its IP address -
ping -c1 pi4.localIf I forgot the name of my Pi, I can check the address the laptop handed out over the cable:
sudo cat /var/lib/NetworkManager/dnsmasq-*.leasesThis will show something like -
1793837033 xx:xx:xx:xx:xx:xx 10.42.0.23 pi4 yy:yy:yy:yy:yy:yy:yyThe IP address is in the middle of the line.
5. SSH into the Pi
I can ssh to the Pi using the name or the IP address -
ssh pi4.local
# or
ssh 10.42.0.23
The Pi should now have internet access.
From the Pi, try pinging 9.9.9.9 and quad9.com to verify that the Pi has internet and DNS access.
6. Resetting the profile
After you disconnect the Pi, change the profile back to the original method (probably Automatic (DHCP)), so that when you plug the laptop into a router, it gets an IP address from the router.
Future posts
I will cover how to do the above when the laptop is running a VPN.
Having to change the profile manually each time is a bit of a pain. But it is possible to set up multiple profiles for the same interface and have the laptop pick the right one by itself.