Setting up a Raspberry Pi without a Monitor, Keyboard, or Network
This is very similar to my previous post about sharing internet access from Ubuntu to a new Raspberry Pi.
In this, I will show how you can start using your Raspberry Pi without a monitor, keyboard, Ethernet network, or wifi connection.
I am not going to explain how to set up the Pi, that is covered in many other places. I suggest following the guide on the Raspberry Pi website. Follow the headless instructions, but I will show how to connect to it when you don’t have an Ethernet or wifi network.
My Setup
I have -
- Ubuntu on my laptop (but similar steps should work on other OSes)
- Raspberry Pi 4 with the 64-bit Lite OS
- an Ethernet cable connecting the two devices
Follow the headless setup instructions
Install the OS on the SD card, give your Pi a name, for example pi4, and enable SSH. Don’t put in any wifi credentials, because you don’t have a network to connect to
Sharing Internet from Laptop to Raspberry Pi
On the Ubuntu computer where you imaged the SD card, plug in an Ethernet cable. Don’t connect it to the Pi just yet. It doesn’t have to be a crossover cable, a regular Ethernet cable will work.
1. The Ethernet Connection
Go to Settings → Network.
There might be a few sections - the top one is probably the one you need. It might be called Wired, Ethernet, PCI Ethernet, or something similar.

2. Changing the Profile
Click the gear icon to edit the profile, move to the IPv4 tab, and change the method to Shared to other computers. Click Apply.
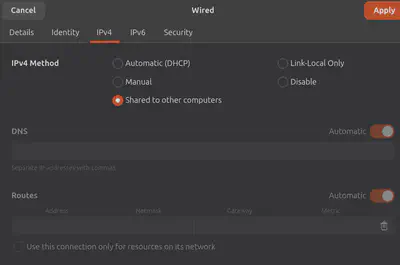
3. Connecting the Laptop and the Pi
If you haven’t done so already, plug the cable into the laptop and the Pi. The Pi should get an IP address from the laptop via DHCP.
4. Finding the Pi’s IP Address
I know the name of my Pi is pi4, so I can ping it at pi4.local to see its IP address -
ping -c1 pi4.localIf I forgot the name of my Pi, I can check the address the laptop handed out over the cable:
sudo cat /var/lib/NetworkManager/dnsmasq-*.leasesThis will show something like -
1793837033 xx:xx:xx:xx:xx:xx 10.42.0.23 pi4 yy:yy:yy:yy:yy:yy:yyThe IP address is in the middle of the line.
5. SSH into the Pi
I can ssh to the Pi using the name or the IP address -
ssh pi4.local
# or
ssh 10.42.0.23
That’s it, you set up Pi and connected to it without any network.
6. Resetting the profile
After you disconnect the Pi, change the profile back to the original method (probably Automatic (DHCP)), so that when you plug the laptop into a router, it gets an IP address from the router.