Installing .NET on Windows Without Admin Privileges
I was chatting to a friend a few weeks ago when he told me that he couldn’t install .NET on a Windows computer where he doesn’t have admin access. When he tried to run the MSI installation files, he was prompted for an admin password, which he doesn’t have.
Here is a simple guide to installing and running .NET on a Windows computer without administrative privileges.
Get the zip file version of .NET
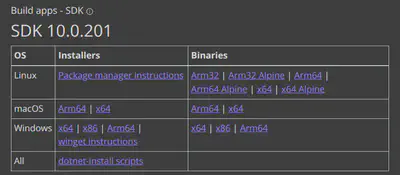
Go to https://dotnet.microsoft.com/en-us/download/dotnet/10.0, choose the version of .NET you want, and the binary that suits your architecture. If you are using Windows, it is probably x64.
Unzip
Choose a directory on your computer where you can create directories. If you don’t have admin rights, you might not be able to create directories directly on C:\Program Files.
Try creating a c:\dotnet directory.
If that works, unzip the full contents of the file you downloaded into this new directory.
Try it out
You can now test the dotnet command.
Open a command prompt or PowerShell and navigate to the c:\dotnet dir and run dotnet.
This will work, but once you move to another directory, it won’t.
Setting the environment variables
There are two variables to set. Update the path to include the dotnet.exe file, and add DOTNET_ROOT to point to c:\dotnet.
To set these, go to the start menu, then search for “environment variables”, you will see a match like “Edit the system environment variables”, open this. Then, click “Environment Variables…” in the bottom right corner.
You can make the changes in the user variables or the system variables.
Depending on the restrictions on your computer, you might be able to edit only the user variables.
Add the new DOTNET_ROOT and update the Path with c:\dotnet at the front.
Done
Open a new command prompt or PowerShell. You should be able to run dotnet and create, build, and run projects.