Using OBS Studio to Record Podcasts for Free
For the past few months, I’ve been using OBS Studio to record my podcasts. It is not a traditional podcast recording tool, but it is free and easier than some alternatives.
Background
I’ve been making podcasts since 2014, long before they became as popular as they are today. Back then, there weren’t any of the polished websites you can use now to make the recording.
I used to use Skype with a tool that let me record the audio. One person on the left channel and one on the right channel. I paid a small, one-time fee for the tool. This is what I used for years. If the internet connection was a bit flaky, I would lose some of the audio for that person, but it didn’t happen too often.
A few years ago the podcast recording websites started to appear. The ones that record both sides of the conversation locally and constantly upload the audio to their servers, so you lose nothing if your internet connection is not 100%.
They usually offered a free tier for low usage hobbyists, like me. Maybe something like 2 hours a month. The paid tiers were around $20 a month, but you couldn’t sign up for one month; you had to pay for a year in advance. So the cost is a bit much for a hobby, I record at most an episode a month, and I make $0 from my podcasts, and I have no ads.
Then some of these companies removed their free tier, leaving only the pay for a year in advance option. I didn’t want to do this, so I started looking for alternatives.
A couple of companies continued to offer a free tier, but even they have removed most of what was available on the free tier. So I wanted a reliable alternative that I could use.
Recoding the traditional way
The first choice is was to go back to my physical audio recorder, the Zoom H5. This takes two XLR mics and two 3.5 mm mics. I got it for in-person recordings. But for calls on the computer, it’s a bit messy wiring this through the computer for the guests audio, and putting the XLR mic in front of me. It works and will always be a good fallback option, but not my preference.
I wanted something a little simpler. Then I found OBS Studio.
OBS Studio
OBS Studio is a free, open source tool that is mainly used to record and stream video. But, it can be used to capture audio from multiple sources, to individual tracks. This makes it perfect for recording podcasts.
I have it set up to record the audio from my microphone and the audio from the other side of the call when making a podcast. OBS Studio actually supports up to six audio sources. It will, of course, lose audio if the internet connection has problems, but that doesn’t happen often.
Getting it up and running the first time didn’t go smoothly, but it wasn’t the fault of OBS Studio, it was due to the Linux OS holding on to a mic during setup. OBS Studio couldn’t see a mic so when I made a recording, no audio from the mic was recorded. As a first time user, I didn’t know about where to fix this and it took a bit of time.
Setup
For Windows you download an .exe and install it.
For Linux there are a few options, but I would recommend following the instructions on the OBS Studio website for your distribution. There is also a Mac version available.
For Ubuntu, this is what you do -
sudo add-apt-repository ppa:obsproject/obs-studio
sudo apt update
sudo apt install obs-studio
After you have installed and run it, you will be asked how you plan to use it. Choose optimize for recording, then for video settings, leave the defaults.
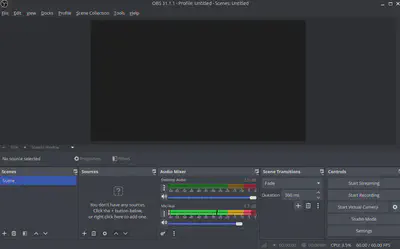
OBS Studio will open to the main window, with two sources in the Audio Mixer - Desktop Audio and Mic/Aux. The Mic/Aux should be moving to show the volume of audio it is capturing. If it is, you can skip the next step.
If the Mic/Aux is not showing movement
This is what happened to me. The mic seemed dead.
After some messing around, I found the fix.
Go to the File menu => Settings => Audio.
Then, in the Global Audio Devices section, set the Mic/Auxiliary Audio to your microphone, or choose “Default”.
Then click Apply and OK.

Now you should see the Mic/Aux moving when you speak into the mic or even from the background noise.
Setting the channels
When you record a podcast, you want to have the audio from your mic on one channel and the audio from the other person on another channel. This makes it far easier to edit later.
There are a couple of things that need to be set up for this.
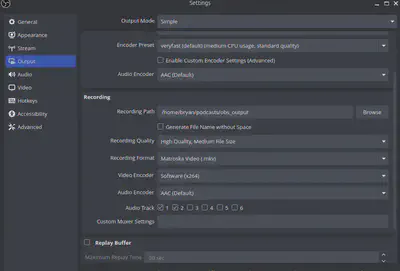
Go to the File menu => Settings => Output.
In the Recording section, choose Audio Track 1 and 2. Unselect the rest.
While you are here, set the Recording Format to mkv, you can also adjust where the file will be saved.
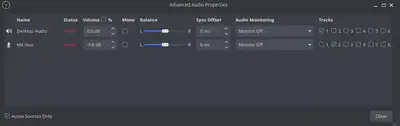
Now go to the Edit menu => Advanced Audio Properties.
Assign one of the audio sources to Track 1, and the other to Track 2. And deselect the rest of the tracks.
That’s the hard work done. Now you can start recording.
Recording
This is the easy bit. Press start, and record your podcast. When you are done, press stop.
The mkv can be opened in Audacity or any other audio editor, and you will see two tracks, one for each person.
NVENC or AMD encoders error
When you start recording, you might get this error -
Starting the output failed. Please check the log for details.

Note: If you are using the NVENC or AMD encoders, make sure your video drivers are up to date.
Go to the File menu => Settings => Output.
In the Recording section, set the video encoder to Software (x264).
There you go, you can now record your podcasts with OBS Studio.