GitHub Actions with .NET, Part 1 - Hello World and Downloading the Artifact
Full source code available here.
- Part 1 - Hello World and Downloading the Artifact
- Part 2 - Dependant Jobs
- Part 3 - Manual Approvals
- Part 4 - Building an S3 bucket with Pulumi
- Part 5 - Build a .NET Application and Upload to S3
This is the first of a few posts on GitHub Actions. This first will be fairly basic, compile a Hello World application, zip up the binaries, and make them available to download.
In future posts, I’ll show how to add approvals and deploying to AWS, but for now, simple is best.
I have a tiny console application that prints “Hello World”.
1class Program
2{
3    static void Main(string[] args)
4    {
5        Console.WriteLine("Hello World!");
6    }
7}
Nothing to it!
The fun is in the GitHub Action workflow.
Adding the GitHub Actions Workflow
First off, you need to have your code in a git repo and the repo has to be hosted in GitHub, accounts there are free for personal use.
Add this directory structure to your repo .github\workflows.
In that directory add a file named build.yml. The file will contain instructions on how to build the application.
If you are not familiar with yaml, it can be a little daunting at first. So this example should get you on the way - it will build the source, zip the compiled files in the release directory and make that zip available for download.
The workflow is triggered when there is a push to the main branch, i.e. if you commit and push to main, or if you push to a different branch, perform a pull request, and merge.
I’ll breakdown the workflow in a moment but here is the whole thing -
 1name: A workflow to build an application
 2
 3on:
 4  push:
 5    branches: [ main ]
 6
 7jobs:
 8  build:
 9    name: Build the app
10    runs-on: ubuntu-latest
11
12    steps:
13    - name: Checkout source code
14      uses: actions/checkout@v2
15
16    - name: Setup .NET
17      uses: actions/setup-dotnet@v1
18      with:
19        dotnet-version: 5.0.x
20
21    - name: Restore dependencies
22      run: dotnet restore
23
24    - name: Build
25      run: dotnet build -c release --no-restore
26
27    - name: Upload a Build Artifact
28      uses: actions/upload-artifact@v2.2.2
29      with:
30        # Artifact name
31        name: GitHubActionsHelloWorldConsoleDownloadableArtifact #.zip will be added automatically
32        path: bin/release/net5.0/*.*
Piece by Piece
These first lines define the name of the workflow - “A workflow to build an application” in this case, and that it should be triggered when there is a push to the main branch, i.e. if you commit and push to main, or if you push to a different branch, perform a pull request, and merge.
1name: A workflow to build an application
2
3on:
4  push:
5    branches: [ main ]
The next portion of the file gets into the meat of what I want to do, build my application. I’m stating that the build job should happen on the latest Ubuntu image available.
1jobs:
2  build:
3    name: Build the app
4    runs-on: ubuntu-latest
This portion of the file checks out the source and performs the build using the latest version of .NET 5.0.
 1    steps:
 2    - name: Checkout source code
 3      uses: actions/checkout@v2
 4
 5    - name: Setup .NET
 6      uses: actions/setup-dotnet@v1
 7      with:
 8        dotnet-version: 5.0.x
 9
10    - name: Restore dependencies
11      run: dotnet restore
12
13    - name: Build
14      run: dotnet build -c release --no-restore
At this point, I have a compiled application sitting in a directory on a Ubuntu container running somewhere in the GitHub cloud. To download it to my computer I first have to upload it from the container to an accessible GitHub location.
1    - name: Upload a Build Artifact
2      uses: actions/upload-artifact@v2.2.2
3      with:
4        # Artifact name
5        name: GitHubActionsHelloWorldConsoleDownloadableArtifact #.zip will be added automatically
6        path: ./bin/release/net5.0/*.*
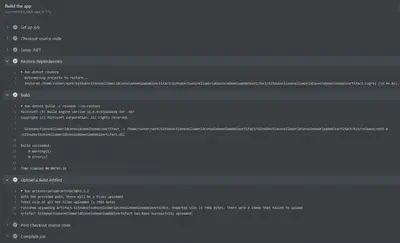
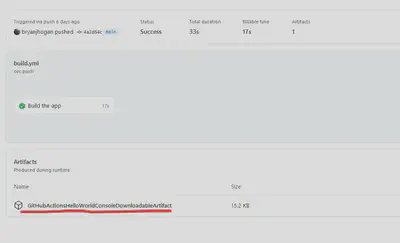
When you commit this code to the main branch, GitHub Actions will kick off the workflow. You should see output something like the below.
The zip file with the compiled code can be downloaded by clicking on the link.
Full source code available here.

